This article describes the module settings.
This article describes the module settings.
Some of these parameters are located in the first module configuration tab, other in the extended configuration, it also depends on your Joomla-version.
Lets discuss the settings:

1.) Title
Title of the module. This is a joomla!-default field. If you use more than 1 flexheader module on your site, you can change this to identify the module.

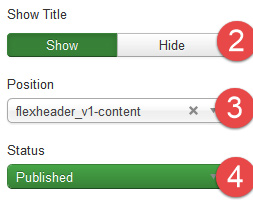
2.) Show title
When using Flex header displaying the title usually makes no sense. Therefore this setting should be set to "hide".
Note: The display of the title depends on Joomla! Module Chrome.
3.) Position
Specifies the module position where Flexheader will appear. Module positions are programmed individually in each template .
To view this module positions , I recommend this guide: Finding module positions on any given page.
Should the template not have an appropriate module position, it is possible to add a module position with very little effort.
Contact me for this Service.
4.) Status
Should be set to "published", otherwise flexheader is disabled.

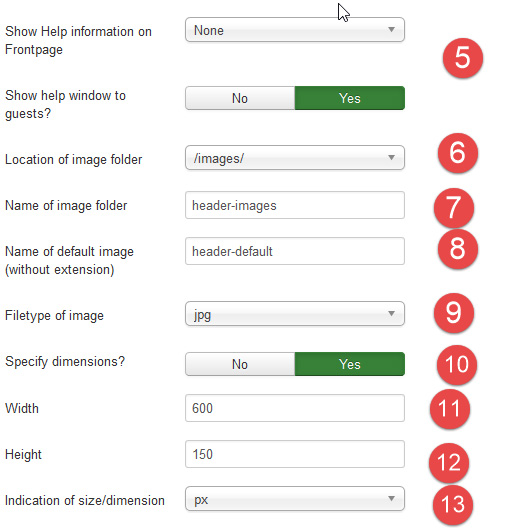
5.) Show Help information on frontpage
This setting displays helpful information on the frontpage. This feature is enabled by default after Flexheader3 Installation. Please turn it off after configuring Flexheader3.
The window contains the information about naming your pictures. Just read ne displayed filename and rename your header-image, so it can be loaded by Flexheader3.
This setting has 2 options:
- for endusers: A Small information window with information about path and filenames of the header images
You should use this option! - for developer: A large window with many informations, useful for debugging a developing

The 2nd option can be used to hide the help window from guests.
In this case you have to be logged in (frontend) to see the Help window.
6.) Location of image folder
Here you can decide where your header images are stored
- /images/: Use of the cental /images/folder if your webspace
Use this option to upload pictures using the joomla! image/media manager - /templates/current-template: Store your images in your template folder
In this case, Flex Header will also use different folders for different templates
Normally you will use the central /images folder, because this folder is accessible via the joomla builtin media manager. If you use various templates on your site, it may be better to store the images inside the template folder to use separate images in every template.
7.) Name of image folder
Lets store all header-images i a subfolder of the folder choosen above. If you need more than one module on your site, use this parameter to seperate the images, "header-images1", "header-images-left" for example.
8.) Name of default image (without extension)
Flexheader3 needs at least one default image to be functional. It is used if not other image matches, also as a fallback for new content with no assigned header-image
9.) Filetype of image
Here you can choose the filetype of your image. Just select one from the list. Flexheader3 will not use images that dont match the Filetype extension.
The Filetype is case sensitive!
10.) Specify dimensions
Turn off this option if you are well informed about CSS and set your size/dimensions using your own CSS.
These setting should be set to "no" on a responsive template with variable header sizes and use of CSS for sizing flexheader.
11. & 12.) Height & Width
This setting is used to set the dimensions of the module. If you set "%" in setting 13, you need to enter %-values here.
13.) Indictaion of Dimensions
The size specification can be output in pixels ( px ) or in % values.
For % you will usually specify 100 in settings 11 and 12, this setting is used primarily to avoid the insertion of CSS code

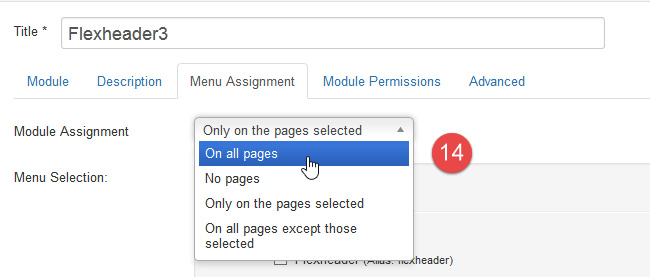
14.) Menu Assignment
Set this to "on all pages"

15.) Display mode
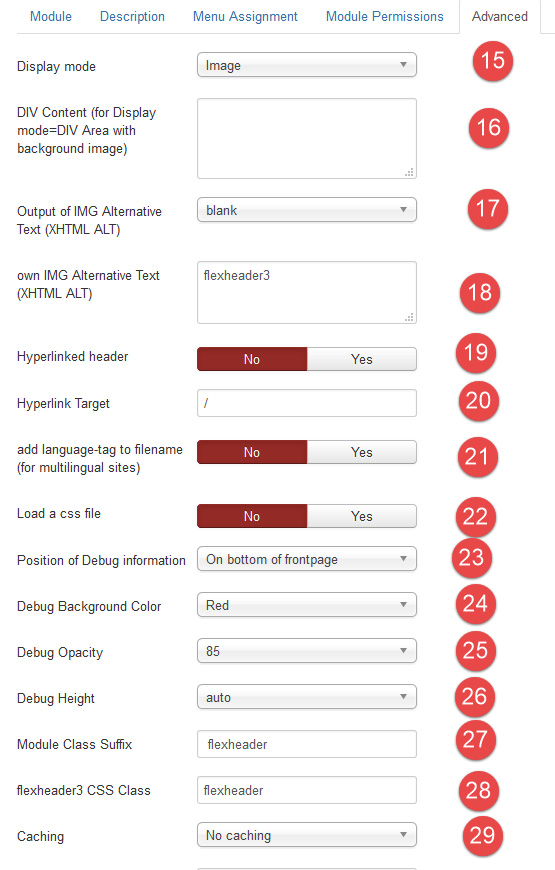
Normally a image is displayed using the html img tag. Flexheader3 can also display a DIV with your image as its background.
Use DIV instead of IMG if you need an overlay over your header image. DIV uses your image as a background, so you can easily put text, other images, links ... as an overlay.
16.) DIV Content (for Display mode=DIV Area with background image)
Here you can enter text or html code as content for your DIV.
you want to overlay your logo over your header-images, just type:
<img src="/images/my-company-logo.png" alt="Your Company" title="Your Company" />
and use CSS to configure the position.
17.) Output of IMG Alternative Text (XHTML ALT)
In XHTML an image needs an ALT Attribute. Browsers that cannot display images displays this text instead of displaying the image. Some browsers also displays this text as a tooltip. You can leave this empty without breaking XHTML compatibility.
Choose one of the following parameters:
- blank: outputs nothing
- Joomla!-Pagetitle: Uses the title of the current page, for example "contact - sitename"
- own text: Uses your own text, see the following parameter
18.) own IMG Alternative Text (XHTML ALT)
Type your own text for the img ALT Attribute there.
19.) Hyperlinked header
Adds a hyperlink arround the image.
20.) Hyperlink Target
The destination of the hyperlink, use "/" for home.
21.) add language-tag to filename (for multilingual sites)
This special option adds the language tag to the filename. This option is only needed if you use menu items or content configured to display the same content in all languages, but you still need different header images depending on the language .
22.) Load a css file
loads a css file, where you can add css code to style the specific site in joomla. no need for seperate templates anymore. Just name your css file the same way as you would name the image. There is no need to have a image with the same filename as the css, you can also use this function with the default image.
As a result, strong styling interventions are possible because any entries are possible in this CSS file.
Common applications:
- show another background image per menu item / page
- different text colors, etc. per menu item / page
If you want to only use the CSS file, you can see the output size (settings 10 to 12) set to 0px. Using the "default image" (setting 8) is necessary, also if you dont to hide it, otherwise flexheader displays an error message.
23 to 26.) Debug information
These settings refer to setting 5 and normally there is no need to change them.
Here you can specify where and how the "Show Help information on Frontpage" appears.
If you use multiple Flexheader modules at the same time, you can set position and color of help windows. For example: a blue help window for flexheader module 1 at the top of the screen, the other hwlp window on the end of the screen.
27.) Module Class Suffix
This parameter adds an CSS class to the module container. This is handled by joomla and depends on the module chrome style.
28.) Flexheader3 CSS Class
This CSS class is added to the Flexheader3 Objekt -> IMG, DIV... itself. You probably need this for special CSS styling issues.
29.) Caching
You should turn module caching off, because flexheader3 cannot change images while cached.


