

AVM, the manufacturer of the FRITZ!box describes on its support pages: "Setting up a VPN connection to the FRITZ! box with Shrew Soft VPN Client".
If you follow these instructions, you have to enter your username and password for each connection, which is a safe bet, since a PSK is also used.
This article describes an alternative, password-free connection setup that can also be easily automated.
Please note that this scenario offers less security than the configuration described by AVM - so you should know what you are doing!
This is not about connecting two networks with each other, but we want to establish a connection in the context of a user. This could be a client that should connect automatically and normally runs unattended, where no one can enter user name and password.
For authentication we use a fictitious user name and a password (Pre-Shared-Key) and also assign a fixed remote IP address within the IP range of the FRITZ!Box. We also use the DNS server of the Remote-FRITZ! box and can use name resolution to access network drives or printers, for example.
We determine these data in advance
We determine the following data in advance and then replace them in the files shown below:
- Remote-Host: my.dyndns.host
To establish the VPN connection, the FRITZ! box must somehow be accessible via the Internet. We are therefore setting up a DynDNS service here. The FRITZ!box supports various providers, AVM itself also operates such a service. - Username: me@domain.com
It doesn't really matter what it says here, but it should be meaningful - PreSharedKey (PSK): .....................<your-psk-here>............................
A secret key, here the password so to speak - The IP range of your FRITZ!Box
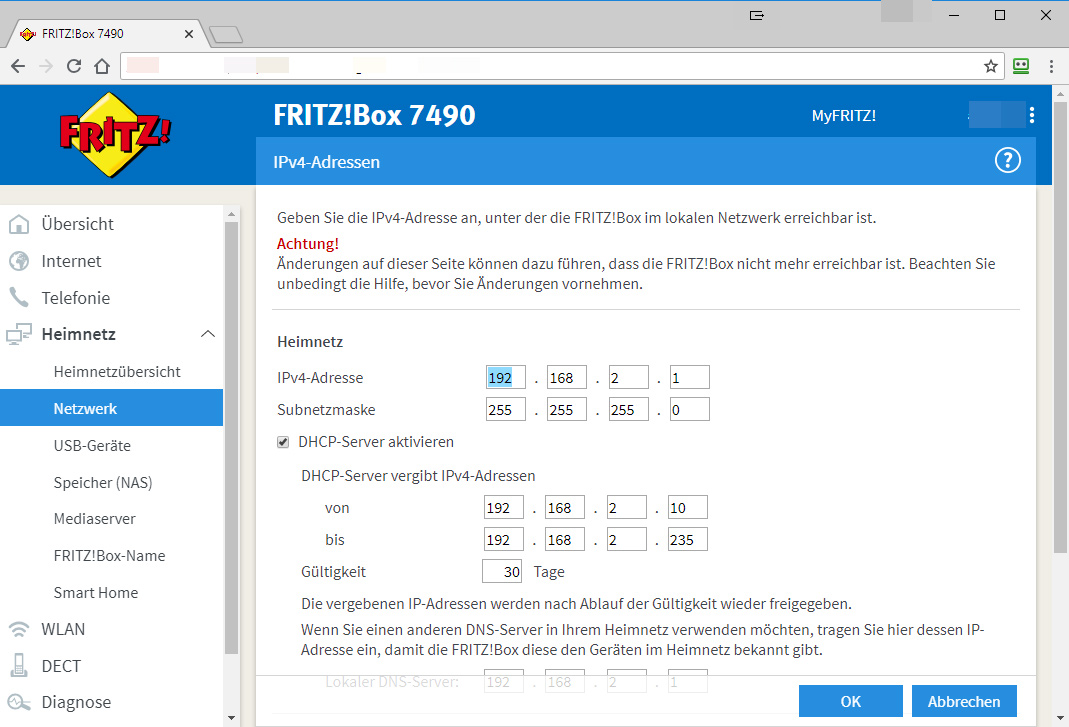
Here you can see the IP range of your FRITZ!Box - Remote IP address of the accessing client
An IP address from the FRITZ! box range (by default the network is 192.168.178.0 in many FRITZ! boxes, but I always change this).
This IP address must be outside the DHCP range and should be unique for each configuration created here, if you want to use several incoming VPN connections simultaneously. - Remote IP address of the FRITZ! box for "DNS server" entry
Configuring the Fritz!box
Create a file " FRITZ!Box-vpn.cfg" with this content:
vpncfg {
        vpncfg_version = 1;
        connections {
                enabled = yes;
                editable = no;
                conn_type = conntype_user;
                name = "me@domain.com";
                boxuser_id = 0;
                always_renew = no;
                reject_not_encrypted = no;
                dont_filter_netbios = yes;
                localip = 0.0.0.0;
                local_virtualip = 0.0.0.0;
                remoteip = 0.0.0.0;
                remote_virtualip = 192.168.2.231;
                keepalive_ip = 0.0.0.0;
                remoteid {
                        user_fqdn = "me@domain.com";
                }
                mode = phase1_mode_aggressive;
                phase1ss = "LT8h/all/all/all";
                keytype = connkeytype_pre_shared;
                key = ".....................<your-psk-here>............................";
                cert_do_server_auth = no;
                use_nat_t = yes;
                use_xauth = no;
                use_cfgmode = no;
                phase2localid {
                        ipnet {
                                ipaddr = 192.168.2.0;
                                mask = 255.255.255.0;
                        }
                }
                phase2remoteid {
                        ipaddr = 192.168.2.231;
                }
                phase2ss = "LT8h/esp-all-all/ah-none/comp-all/pfs";
                accesslist =
                             "permit ip 0.0.0.0 0.0.0.0 192.168.2.231 255.255.255.255";
                app_id = 0;
        }
        ike_forward_rules = "udp 0.0.0.0:500 0.0.0.0:500",
                            "udp 0.0.0.0:4500 0.0.0.0:4500";
}
Replace the following values with the values you specify:
- me@domain.com
you have to replace this value twice with "name" and with "user_fqdn". - .....................<your-psk-here>............................
Here you enter your secret key, you can enter anything, but I had problems if the key had a length other than 64 characters. - 192.168.2.0
Here you enter the IP range of your FRITZ!box - 192.168.2.231
Here you enter the remote IP address you have specified for the accessing client
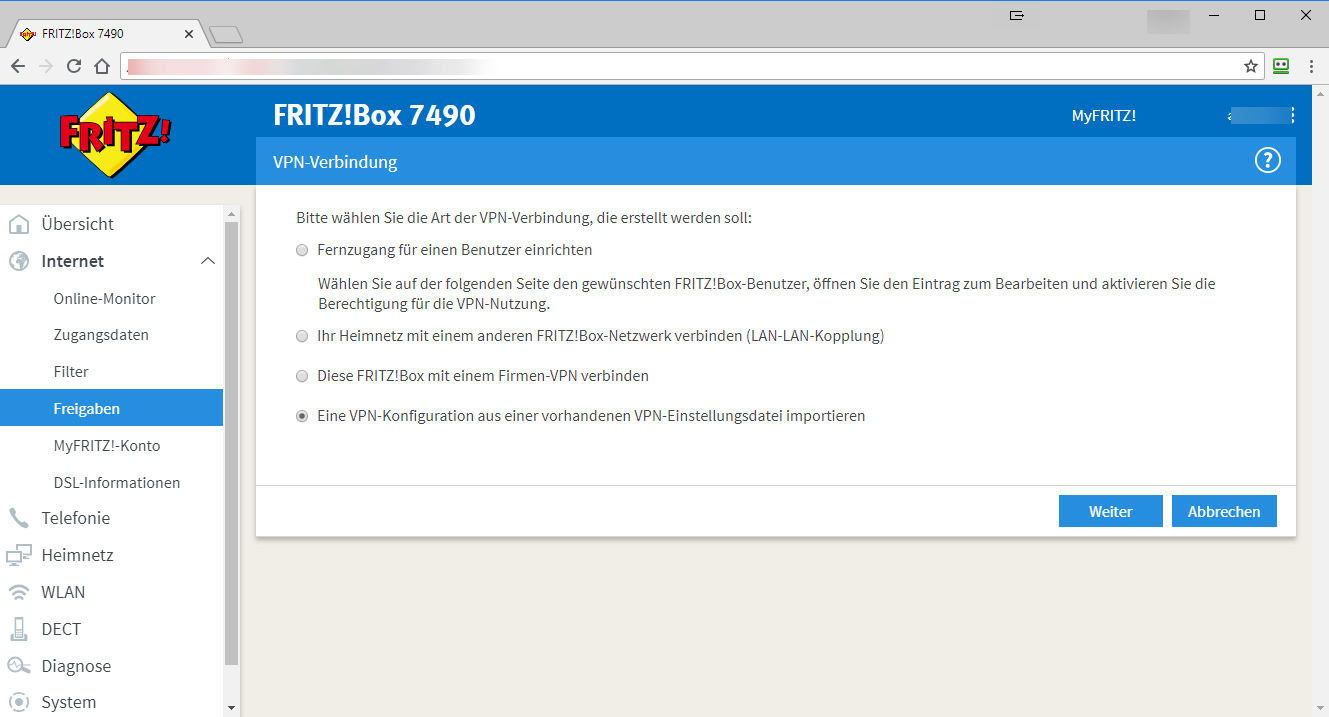
Then you can import the file into your FRITZ! box under "Internet -> Shares -> VPN -> Add VPN Connection -> Import a VPN configuration from an existing VPN settings file".
Configuring the Shrewsoft VPN Client
Create a file "my vpn connection.vpn" (I would advise you to use the hostname here) with this content:
n:version:4
n:network-ike-port:500
n:network-mtu-size:1380
n:client-addr-auto:1
n:network-natt-port:4500
n:network-natt-rate:15
n:network-frag-size:540
n:network-dpd-enable:1
n:client-banner-enable:1
n:network-notify-enable:1
n:client-dns-used:1
n:client-dns-auto:0
n:client-dns-suffix-auto:1
n:client-splitdns-used:1
n:client-splitdns-auto:1
n:client-wins-used:1
n:client-wins-auto:1
n:phase1-dhgroup:2
n:phase1-keylen:256
n:phase1-life-secs:3600
n:phase1-life-kbytes:0
n:vendor-chkpt-enable:0
n:phase2-keylen:256
n:phase2-life-secs:3600
n:phase2-life-kbytes:0
n:policy-nailed:1
n:policy-list-auto:1
s:network-host:my.dyndns.host
s:client-auto-mode:pull
s:client-iface:virtual
s:network-natt-mode:enable
s:network-frag-mode:enable
s:client-dns-addr:192.168.2.1
s:auth-method:mutual-psk
s:ident-client-type:fqdn
s:ident-server-type:address
s:ident-client-data:me@domain.com
b:auth-mutual-psk:
s:phase1-exchange:aggressive
s:phase1-cipher:aes
s:phase1-hash:sha1
s:phase2-transform:esp-aes
s:phase2-hmac:sha1
s:ipcomp-transform:disabled
n:phase2-pfsgroup:2
s:policy-level:auto
Replace the following values with the values you specify:
- my.dyndns.host
After "network-host:" you have to enter the name hostname of your FRITZ!Box - 192.168.2.1
Behind "client-dns-addr:" belongs the internal IP address of the FRITZ!box as DNS server - me@domain.com
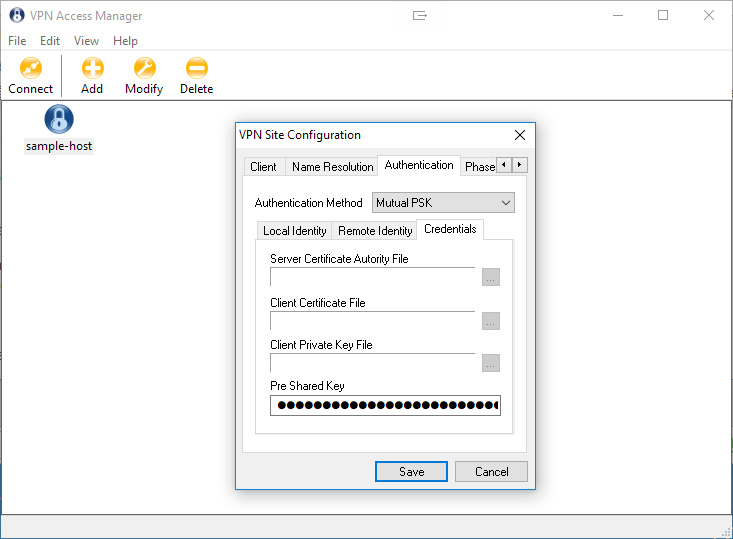
Now import the configuration in the "VPN Access Manager" software under "File -> Import" and then specify a name for the connection.
Now edit them by clicking on the connection once and then on "modify". Switch to "Authentication" and then to "Credentials".
Enter your "Pre Shared Key" in "Pre Shared Key" and save.
Then you can make the connection - done.
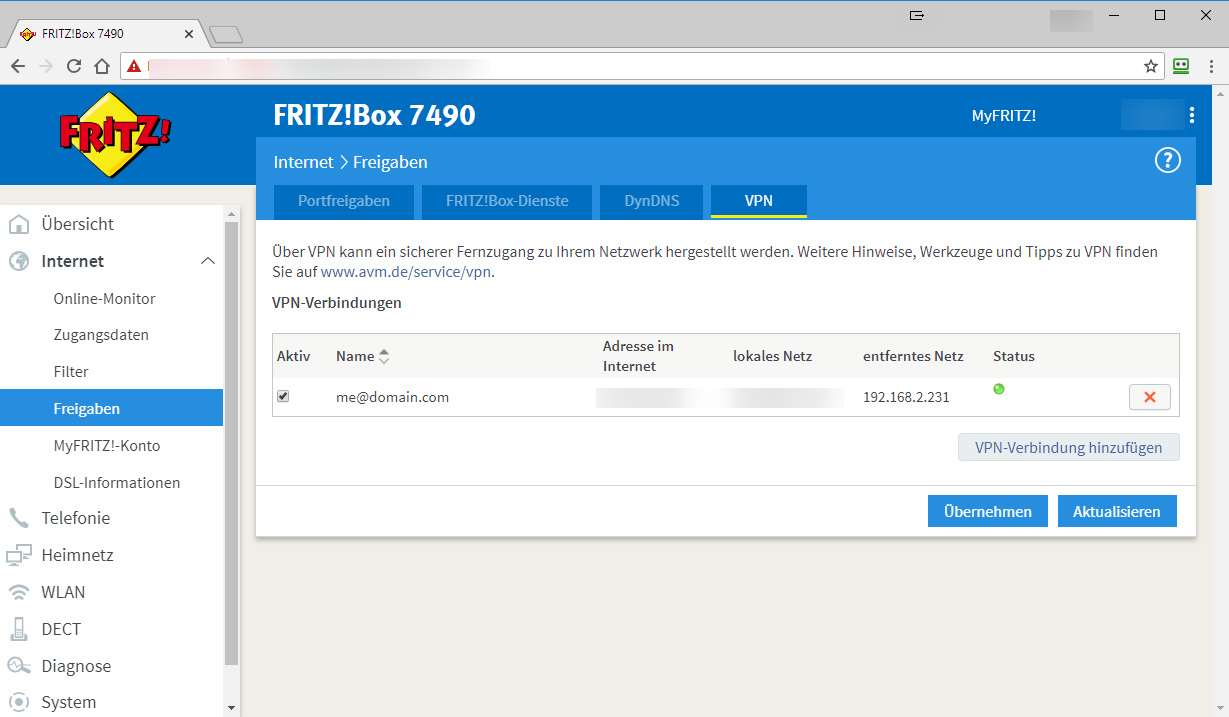
If the connection was established correctly, the FRITZ! box shows a green dot in the VPN overview:
Automatic connection when logging in to Windows
Do you want to connect automatically when you start your computer?
Create a file "meinevpnverbindung.cmd" and save it somewhere.
Enter in the file:
timeout /T 30  > nul
c:
cd "C:\Program Files\ShrewSoft\VPN Client\"
start ipsecc.exe -r <Name of your VPN-connection> -a
Put a shortcut to this file in your autostart. You can do this by simultaneously pressing the "Windows" and "r" keys. A small window opens and you type: "shell:startup". In the Explorer window that opens, you can insert the link or the file.
Translated with www.DeepL.com/Translator